
Well it has been a few days since my last entry and some things have changed, some for the better and well, let’s not go there. Positivity is the watchword right now.
We moved the Misty Lady from her maintenance slip around to the “haul out” slip to be lifted out of the water by the huge Travel Lift machine. Getting the Lady out of the slip, around the point and into the haul out slip was a true herculean effort and I applaud our yacht broker, Walt for excellent seamanship to move this huge boat with only one engine (designed to move with two, not one), and get her around the tight spaces and into the slip.
Actually we stopped her about 20 feet from the slip to let Walt and I disembark (not allowed to have human beings on a boat being hauled). Then we all gathered together to push, pull and say a few words until she was bow first into the travel lift pickup. The operator halted our forward movement and then asked me if she had stabilizers, when I answered yes, we had to pull her back out a bit so the straps could be adjusted for the additional function of our stabilizer units. Then we repeated the process to move her into the haulout slip. The travel lift operator started the process of lifting the Lady up, up and out of the water. Unfortunately at the time, I could not photograph that process. Because at the time, my iPhone was resting on the bottom of the slip waters where it fell as we were removing the lines. Yikes! That is another story altogether… later!
When the boat had been lifted high enough to clear the area of the dock/piers, the Travel Lift operator moved her further on land and into an area where the yard technicians would perform a powerwash to clean her bottom of little critters that like to cling and eat away the paint, not to mention slowing the boat speed. This process took another 20 minutes or so but the creatures, the water slime and mud stuff were finally washed off and on the ground cover designed for this process.
Once the Lady’s bottom hull had been washed, she was moved to a section of the yacht center where she was “put on blocks” so that maintenance functions and eventually the bottom painted with anti-fouling paint could be performed. This is a picture of her sitting on the blocks: Doesn’t she look rather sad just sitting on those blocks on DRY LAND? BTW the car sitting in the right foreground is our new GMC Terrain Denali small suv.
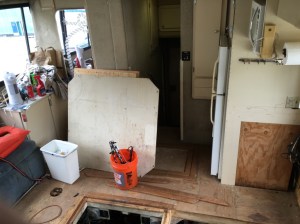
Once the lady was on the blocks and the stabilizing stands were positioned under her hull, the yacht center technicians began prepping her for the removal of her starboard engine. The original plan for cutting a hole in her side was sacked because of the position of the engine and that the hole would actually have to be partially below the water line. Bad news for boats of any size. So the decision/plan was laid out to remove the galley cabinet along with the stove and the dishwasher to expose more of the galley floor over the engine. Then a hole would be opened up over the engine to allow the diesel technician access to the components and enable them to raise the engine straight up and out of the galley floor section. This is what the galley floor hole looks like and you can see the engine on the right. It is painted white. The hole on the left is the normal engine room hatch and the red engine is the AC generator set that provides electricity while underway. We actually have two of these generators.

This photo below, shows the panels that were cut from the floor and which will be replaced and new fiberglass sealing will be performed when the new engine is in place. They are leaning against the bulkhead with the orange bucket in front of them. You can see the port galley window just to the left of this shot, this is where the engine will actually be removed from the boat. A forklift will be use to insert the forks, lift the engine in the cradle and slowly and carefully back away until the engine is fully clear of the boat. Of course the guys will have to remove the entire window (frame and all) first. Once the new engine is prepped with the good components and any new replacement parts, it will be installed in a reverse of this removal process. Care and professional expertise are critical to avoid major damage to the yacht bulkheads, flooring, and the windows.
The photos below are a close-up of the blocks that the Lady is resting on for her time out of the water. The steel thingies are stabilizing units that can be adjusted to ensure that the yacht stays in place and does not slide off the blocks. Disaster if that happens! Photo 2 shows a close-up of the stabilizer for this yacht. There is one of these on each side of the hull. They move under sea conditions to maintain the stability of the yacht underway. She will not rock from side to side when the stabilizer system in turned on.

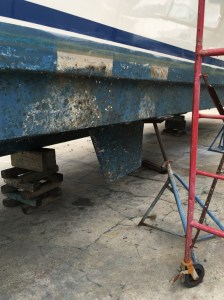
Yeah, I know her bottom looks pretty bad. But when the guys finish sanding and applying the anti-fouling paint and the replacement of gelcoat where needed she will look brand new under there. Those little sea creatures that attach themselves to the hull can really screw up the looks right?
We ordered the new appliances and they should arrive shortly. We were given a delivery ship of two weeks which would have fit perfectly with the replacement of the new engine and the reinstallation of the galley cabinets. Wouldn’t you know! These guys were super efficient and yesterday we received notification that the appliances (except the washer and dryer, naturally) have shipped. They will have to sit on the floor in the yacht center’s storage until the major repairs have completed and the cabinetry is ready to go back into place.
Now if only the contractor workers could be that efficient!
And oh yes, we are STILL in that darn hotel. Needless to say, cabin fever is starting to bite us in the fanny and the “sea cats” are not amused.
More as the things progress.
